The 10 Best Bar Clamps
This wiki has been updated 36 times since it was first published in October of 2016. Bar clamps are an essential tool for wood and metal workers and, as most tradesmen know, you often don't have enough of them. They keep workpieces in place for joining, fastening, or welding, and a given project may require dozens. For our top picks we considered the smoothness of the slide, consistent pressure application, and general build quality, so you can get the most mileage out of them. When users buy our independently chosen editorial choices, we may earn commissions to help fund the Wiki.
1. Jorgensen Cabinet Master

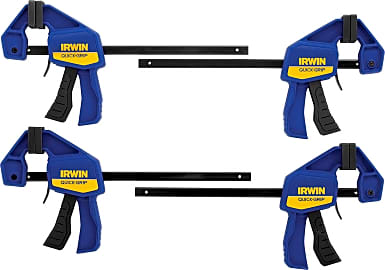
2. Irwin Quick-Grip 5464
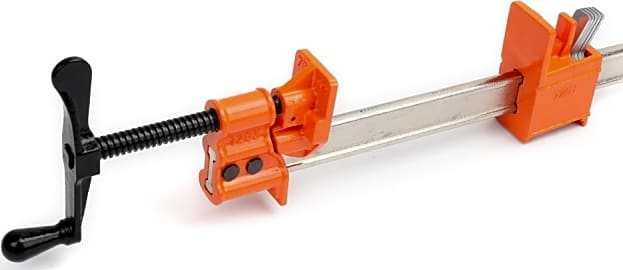
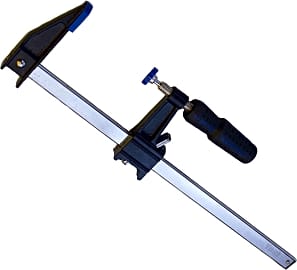
3. Jorgensen 7248
Editor's Notes
November 11, 2020:
For this update, we removed the Tekton 39185 because of durability issues, as well as the Bessey GSCC2. The Bessey GSCC2 model had some operational complaints, and since we already had two high-quality 24-inch options on our list, decided to remove and make room for better options.
Since we only had a single 12-inch option on our list -- the DeWalt DWHT83158 -- we decided to add another, the 12-inch Capri Tools CP11001. It's not the cheapest clamp on the market, but the Capri Tools CP11001 is built to last, and it's obvious that a lot of thought went into its efficient design. Even though it's a relatively small tool, it can provide an impressive amount of clamping power.
Similarly, since we only had one other option longer than 36-inches, we added another extra-long option, the DeWalt Extra Large. This 50-inch clamp would be perfect for large projects like custom closet making, or picture frame work.
The lighter-duty models like the Irwin Quick-Grip 5464, or the Yost 15006 generally don't create enough pressure to dent softer wood, but the larger clamps can, so make sure to keep that in mind. If you're ever clamping soft or delicate wood together, and you're concerned about the clamp face digging in, slide a piece of scrap wood between the two. This scrap wood will absorb any damage from the pad, while still letting the clamp do its job.
If these bar clamps are too heavy-duty for you, these spring clamps might be a better choice. They're not as durable or powerful as the options listed here, but they're much more convenient if you're working with smaller wood or metal pieces. Or, if you want a smaller clamp that can provide a little more precision, these C Clamps could be what you're looking for.
July 22, 2019:
Bar clamps are a versatile tool that prove their worth any time you need something temporarily held in the shop. They can even serve as a stand in for bench vises at some tasks. Woodworking cannot realistically be done without it unless painstaking measures are adopted for applying consistent loads to workpieces. The Jorgensen Cabinet Master, the Jorgensen 7248, and the Irwin Tools Quick-Grip 223124 exemplify varying styles of clamp that are each optimal for different applications. The 7248 can exert a lot of force but is limited by its throat width. The Jorgensen Cabinet Master is the top pick because, not only does it have a wide throat but also, the load is supported across the heads by steel cross-members.
When working with soft woods, even padded clamps will create marks and indentations. Cloth cushioning can be used to minimize this problem and cut down on repair time. Therefore, it is not so much a consideration if a clamp is missing plastic caps on its jaws. In my opinion, they are used unsuccessfully to spread the pressure out to a greater diameter (or maybe their purpose is to ease the worry in the minds of users). The higher-end clamps do that better with larger jaws. If one refrains from overtightening, most jaws won't marr hardwoods.
Bar clamps exert high pressures and as such, there is inherent danger in their use. Use of these tools should be done carefully with due observation of common sense and safety protocol. Wood dust contains harmful particles so breathing protection should be used.
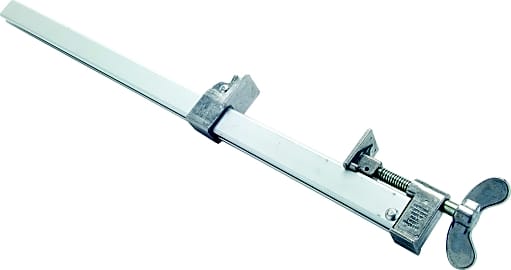
4. Dubuque Clamp Works
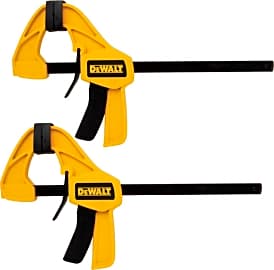
5. Irwin Tools Quick-Grip 223124

6. Capri Tools CP11001
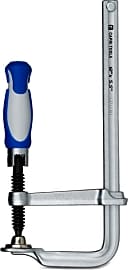
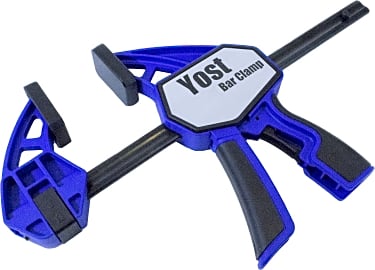
7. Yost Tools F124
8. DeWalt Extra Large

9. Yost 15006
10. DeWalt DWHT83158
The Many Benefits Of Bar Clamps
Unlike many other types of clamps, bar clamps are rather versatile.
Bar clamps, also sometimes referred to as F-clamps or speed clamps, consist of a steel or aluminum bar and two jaws, one of which is fixed, and one of which is adjustable. The sliding jaw comes in one of two styles. One style is tightened using the strength of your hand alone and has a simple trigger that functions as a release and locking mechanism. The other style makes use of a screw mechanism to further increase the clamping force after you have tightened it by hand. On this style, the user slides the adjustable jaw into place, once again using a simple trigger for locking the jaw into place or releasing it. Once the main adjustment to the jaw position is finished, the user then turns the crank to further increase the clamping force.
Bar clamps generally measure between six and 36 inches in length, though there are specialty models that can be found that exceed this length. The width and thickness of the bar also varies in size, with thicker bars being more durable and better for clamping objects that require a high degree of force.
Unlike many other types of clamps, bar clamps are rather versatile. In addition to clamping items together, many models can also create an outward pressure and be used to push objects apart. Bar clamps are very similar in design to pipe clamps and can be used for many of the same applications, though there are certain areas where bar clamps outshine their pipe-based counterparts. For example, pipe clamps have a tendency to bend when a user tries to exert too much force with them, especially models four feet or more in length. Bar clamps are more resistant to flexing, making them better for applications where a high clamping force is needed. If using a bar clamp without a screw mechanism, you can set it into place and release it much more quickly than almost any other type, hence the reason they are commonly called speed clamps.
Bar clamps come fully assembled and ready to use right out of the box. They are also very easy to handle, being lightweight and relatively compact in design. Many bar clamps have some kind of protective padding on the jaws, as well, meaning there is less possibility of damaging your workpieces.
How To Use A Bar Clamp
Using a bar clamp is pretty simple, and the majority of people can figure them out after playing with one for a few seconds. That being said, it is still smart to have a full understanding of the proper method to allow for the most efficient use and reduce the possibility of damaging your workpieces.
The two pieces of wood you are clamping should fit easily within the opening between the two jaws, without feeling as if you have to force them in.
It is important to select the right bar clamp for the job at hand. If you select one that is too small, it won't be able to get a tight clamp on your workpieces, if it can clamp at all, while choosing one that is overly large just makes it unwieldy and prone to getting in the way as you work. The two pieces of wood you are clamping should fit easily within the opening between the two jaws, without feeling as if you have to force them in.
After you have selected the right bar clamp from your collection, you will want to completely clean the bar and the jaws. This helps to ensure that the jaws will slide smoothly as you make adjustments. It can also help to minimize the possibility of marring your workpieces from old, dried-on glue that has adhered to the clamp.
Depending on the type of bar clamp you are using, you may want to lay it down on a table to make positioning your workpieces easier. Next, open the jaws to a capacity that will easily allow you to insert your stock, but not so wide as to cause yourself to have to make unnecessary adjustments once your workpieces are in place. Once you have glued your stock together, or have them in the position you want to for whatever other purpose you need to hold them together, it is nearly time to close the jaws. Before doing so though, we recommend you place a piece of scrap wood or wax paper between the jaws and the stock you are working with, especially if using one of the softer wood species. This will help to prevent causing any damage to the work surface. Slowly close the jaws onto your workpieces until you have achieved the desired clamping force. Ideally you want to the jaws tight enough to firmly hold everything in place, but not so tight as to cause unnecessary stress on the wood, which could potentially crack it or create pressure indentations.
Basic Woodworking Tools Every DIYer Needs
While bar clamps are extremely useful tools, they are by no means the only ones a woodworker needs. To figure out which tools are vital to have on hand in any home DIYer's garage, let's identify the most common activities performed when working with wood: measuring, cutting and ripping, planing and jointing, and sanding and prepping. Now that we know what we will be doing, let's look at what tools help us accomplish this.
Their versatility makes them one of the most commonly used tools in any shop.
Most people have heard the old adage "measure twice, cut once." Considering how important measuring is to carpentry work, we would be remiss if we didn't recommend getting a quality tape measure. Not only are they compact and easy to transport, but they are vital to pretty much every woodworking job. A level can come in very handy, too, especially for anyone creating furniture or cabinets.
A powerful table saw is probably the first power tool in which any aspiring woodworker should invest. Their versatility makes them one of the most commonly used tools in any shop. A jigsaw is the perfect companion to a table saw, as it allows for a number of intricate cuts that would be impossible to create otherwise. You should get yourself a decent planer and router, as well. Flattening wood and creating grooves is essential to many projects. Finally, you'll need to pick up a good sander. We recommend a power sander to make your life a little bit easier. Otherwise you may have to spend hours trying to sand down rough stock before it can be painted.


Alex Rennie is a writer from Los Angeles, CA, and holds a bachelor’s degree in English from the University of Missouri. Having been a successful residential and commercial carpenter for six years in New York City, he has a comprehensive knowledge of woodworking, power tools, and the world of home DIY. His passion for construction and carpentry keep him up to date on the latest gadgets and techniques, and he never misses an opportunity to patch up a drywall dent or sand down a rough edge. In his spare time, he enjoys hiking the Santa Monica mountains with his family and their dogs, and fostering rescue animals.