The 10 Best DSLR Speedlight Flashes
This wiki has been updated 38 times since it was first published in October of 2016. Creating a great photo is often all about lighting. These DSLR speedlight flashes are quick and easy to setup, have better power and range than a built-in unit, and won't drain your camera's battery. Properly used, they'll let any photographer capture better images, and we've ranked them here by strength, versatility, and durability. Make sure the one you like best will work with your camera. When users buy our independently chosen editorial recommendations, we may earn commissions to help fund the Wiki.
1. Nikon SB-5000

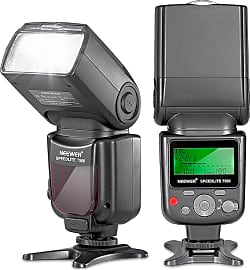
2. Neewer VK750 II TTL
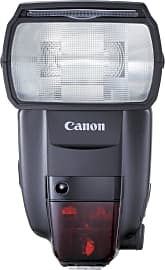
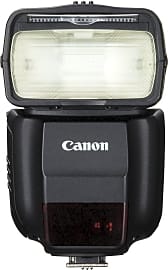
3. Canon 600EX II-RT
Editor's Notes
July 03, 2019:
Despite the fact that mirrorless cameras are not technically DSLRs, the market for both types of camera body has gone from a traditional venn diagram to nearly overlapping circles in the past few years, all but eliminating any distinction between the two sectors beyond their lens mounts and certain capabilities. As such, Canon and Nikon, who finally came out with significant entries into the mirrorless market, did so using the same hot shoe design you'll find on their traditional DSLRs. That's great for consumers, as it means owners of older speedlights have one less thing to upgrade. It also tells us that a list like this deserves to have flashes built for both types of camera: mirrorless and DSLR.
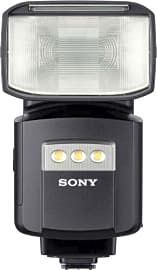
So, while neither Canon nor Nikon have debuted anything new since we last visited this ranking, there are important additions developed for the mirrorless sector that made their way onto the list. Sony's entry is probably the most important, as their line of a-series cameras continues to dominate the market share for mirrorless. Their top offering, the HVLF60RM, delivers many of the same features and specs you'd see on a top tier model from Nikon or Canon, including reliable weather sealing. We also added models from Olympus and Panasonic for their respective lineups. The one model we sent packing was the Altura N1001, which suffered from availability issues and felt a little too cheap for its own good.
4. Sony External HVLF60RM
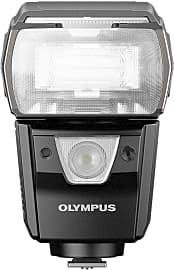
5. High-Intensity FL-900R
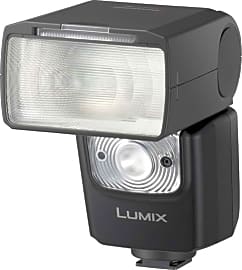
6. Panasonic Lumix Hybrid FL580L
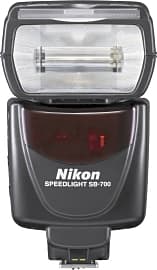
7. Nikon SB-700
8. Canon 430EX III-RT
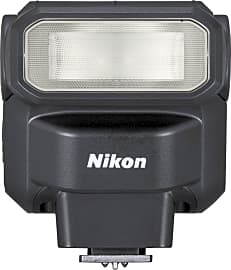
9. Nikon SB-300
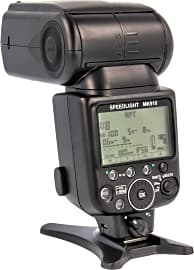
10. Meike MK-910 Flash
Don't Fear The Flash
The key is to stay close to your subject without overpowering the image with light.
A lot of photographers cut their teeth shooting in natural light. If you’re fortunate enough to have a well-lit interior or a generous amount of sun, it’s a lot easier to take stunning pictures. In a poorly lit environment, however, or anytime after the sun has set, you’re going to need some help getting the best possible exposure. Even in well-lit areas, the addition of a flash can give you greater control over the appearance of your subject, from the contours of their face to the tone of their skin.
More often than not, however, shooters will shy away from working with a flash, mainly because the flash photography they’ve taken in the past has turned out so poorly. Flashes built into cameras and cell phones often cause overexposed subjects and underexposed backgrounds, resulting in images that look significantly unprofessional.
If you want to take a high-quality flash photo without spending a few years in art school, you can follow a few simple steps that will soon get you accustomed to the settings that work best in any given situation.
The first thing you need to do is expose for your background. That means finding a good exposure without the flash. If you rely solely on your speedlight to illuminate an area, you’re going to get too many shadows and too much falloff, and your shots will look amateurish. Once you’ve exposed for the background, you can integrate the flash at its least powerful settings until you see your subjects gently popping against a well-exposed background.
Distance from your subject is the next thing you’ll need to take into account. The farther away a light source is from its subject, the harsher that light will look. You can adjust for this by increasing the intensity of the light, but if a stronger flash makes your subjects look overexposed, then you’ll have to stop down on one or more of your settings, which will ruin that background exposure we had just perfected. The key is to stay close to your subject without overpowering the image with light.
The best ways to reduce the intensity of your flash when its softest settings are still too harsh are to bounce it off another surface or to diffuse it somehow. Many of the flashes on our list come with built-in bounce cards and detachable bulb diffusers, but there are excellent options on the market to take this effort even further. Your best friend in these situations is a low, white ceiling. If you invest in a speedlight that can have its angle adjusted, then you can point it upward and bounce your flash off of the top of the room, which makes for soft, agreeable light and the creamiest skin tones.
How To Choose The Best Speedlight For You
If you want to add a speedlight to your DSLR kit, you should know exactly what you want it to be able to do, as some options are significantly more limited than others. This is one of those categories where spending a little more on features you might not need right now is probably a smart idea, as it’s better to have those features to grow into than to be stuck trading in your old speedlight for something better.
If you want to add a speedlight to your DSLR kit, you should know exactly what you want it to be able to do, as some options are significantly more limited than others.
Adjustability is the name of the game here, and that applies both to the physical build of the speedlight and to the direction and power of its flash. The best speedlights in the business allow you to make minute changes to the width of their beams, to the reach of the light they put out, and to the direction in which that light travels, even before you physically move the head of the unit. You’ll tend to pay more money for more adjustable features, but many are worth it.
If you know you only intend to use the one light, and that you either have a dedicated set of strobes for studio work or you have no intention of ever lighting from multiple angles, than you probably don’t need advanced master/slave radio connections. If you want to work events like weddings or have your gear double as a studio kit, then you’ll want to make sure that you can pair and command several flashes from one master unit.
Less expensive options are by no means technically inferior, as a talented and practiced photographer can get some great shots with them, but more features will actually make your job easier in the long run.
If The Shoe Is Hot, It Might Not Fit
Most speedlights communicate with the cameras on which they’re mounted by means of something called a hot shoe. This is essentially a contact point between the computing elements of each unit, as well as a means to attach the flash to the camera physically. A hot shoe has a number of pins that must line up in order for the devices to talk to one another.
A hot shoe has a number of pins that must line up in order for the devices to talk to one another.
Nikon has its own hot shoe design, as does Canon and pretty much every brand of camera on the market. Each company intends to protect its interests by ensuring that you buy their brand of device, but they also need to be compatible with third-party implements they don’t make that rely on the shoe itself, and not necessarily its pins. As a result, if you try to put a Nikon branded flash on a Canon camera, the physical mount will still fit. That can be awfully misleading, as the pins will not line up and the units will not communicate.
When you’re shopping for a speedlight for your DSLR, you’ll find options made by these major brands, as well as those developed by third-party manufacturers. More often than not, these third-party units offer you a lot of similar features as the branded units, but they might not have the same durability or they might suffer from overheating more easily.
The important thing to remember is that third-party flashes can be outfitted with a hot shoe connection for several brands, depending on which you select when you make your purchase, so make sure you’re getting the connection that will fit your camera.


Daniel Imperiale holds a bachelor’s degree in writing, and proudly fled his graduate program in poetry to pursue a quiet life at a remote Alaskan fishery. After returning to the contiguous states, he took up a position as an editor and photographer of the prestigious geek culture magazine “Unwinnable” before turning his attention to the field of health and wellness. In recent years, he has worked extensively in film and music production, making him something of a know-it-all when it comes to camera equipment, musical instruments, recording devices, and other audio-visual hardware. Daniel’s recent obsessions include horology (making him a pro when it comes to all things timekeeping) and Uranium mining and enrichment (which hasn’t proven useful just yet).