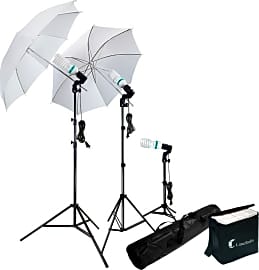
The 7 Best Photo Lighting Sets
This wiki has been updated 46 times since it was first published in March of 2015. Ideal for achieving the perfect shots for products, models, and interviews, these photo lighting sets will illuminate your subjects brilliantly and eliminate annoying shadows that could otherwise ruin an image. Our selection includes inexpensive options suitable for hobbyists, as well as more powerful kits for professional shooters, ranked here by their output, flexibility, and ease of use. When users buy our independently chosen editorial recommendations, we may earn commissions to help fund the Wiki.
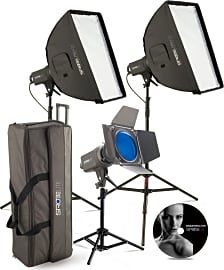
1. Westcott 240 Strobelite

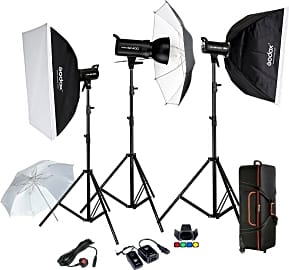
2. Neewer Photo Studio Strobe

3. Photo Basics 231 Strobelite Plus
Editor's Notes
June 14, 2019:
There weren't a lot of new additions on the market worth including in this ranking, as many come from knock-off Asian manufacturers that give consumers a chance to save a buck, but do not come close to living up to the standards you should be setting in your studio, either in durability or lighting consistency and color performance. We did add a great two light kit from Westcott, as well as a special honor for the exclusive and somewhat prohibitively expensive lines by Paul Buff. We also moved the Neewer model previously at number five all the way up to our second position, as they've proven themselves to be a worthy brand in the marketplace, and as their two strobe set offers exceptional power in an easy-to-use design.
Special Honors
Paul C. Buff Among the most sought-after strobes on the market, these bright and reliable flashes are available in several varieties, each of which offers a significant amount of power and adjustability. They're certainly on the expensive side, but they're undeniably professional-grade. paulcbuff.com
4. Godox SK400
5. Linco Lincostore 2000W 3-Color
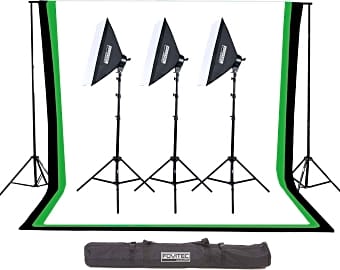
6. Fovitec StudioPro 3000W
7. LimoStudio Portrait 600W
Unnatural Light
Admittedly, I fell into this camp for a time, and I've uttered some form of that natural light nonsense to seasoned photographers and complete rubes alike.
I've spoken to a lot of photographers who've been honing their craft for years, some of whom have been shooting professionally for decades, and I hear the same sentiment from so many of them time and time again. It usually goes something like this: "I prefer to shoot using natural light."
To an unstudied photographer, a statement like this might seem admirable, as though this photographer is so skilled that he or she doesn't need any help from additional lighting. The truth of the matter is that, when you hear a photographer say this (or, let's be honest, if you say this), it's usually an indication that the photographer in question isn't confident with their lighting abilities.
Admittedly, I fell into this camp for a time, and I've uttered some form of that natural light nonsense to seasoned photographers and complete rubes alike. So, I get it. Lighting is an intimidating part of the photographer's education. It's finicky and fickle, it's slow and tedious, and it takes a lifetime to master it.
The good news is that with just a few weeks of practice and a couple of tutorial videos, you can at least get the hang of it, and start building out your style from there.
Now, it's important to understand why the flash on your camera, or a flash mounted in the hot shoe, can't do what these kits can do. Good lighting comes down to your control over three elements: direction, softness, and contrast. With a flash mounted on your camera, you have next to no control over direction, its size severely limits its softness, and it can't create very much contrast, given that it's a single light.
The sets on this list give you multiple light sources that you can place anywhere around your subject, which will provide you with compelling light directions as well as control over contrast. All you have to do is offset the power of one source against another coming from a different direction, and you've got contrast.
The lights in every set we've reviewed also come with what are called banks or soft boxes. These are diffusion and reflection tools the increase the size of your light source. Think about a photograph you might take of a statue on a sunny day. Depending on the position of the sun, you get a certain amount of contrast, but the light is hot and harsh, creating shadows that are too dark and hot spots that overexpose and lose detail.
If you take that same picture on a cloudy day, all those nasty little shadows disappear, and the light is generally more flattering for the statue. That's because the clouds create a natural soft box for the sun, evening out the light and bringing the source much closer to the subject than the sun's eight light-second distance. It may sound counter-intuitive that moving your lights closer will fix a harshness problem in your photos, but make that the first experiment you do with your new set to see if I'm right.
Learn Lighting In A flash
Knowing the kind of shooting you want to do is the simplest way to narrow down our list to your best options. Even though all of the photography lighting sets on our list were designed with still photography in mind, there are some serious sets for the videographers among you, as well.
It should be pretty clear why strobes don't make great lights for video, since they only flash intermittently.
The split between the two camps comes down to the difference between strobe lighting and constant lighting. The names of each ought to give you an idea about how they work respectively, but where strobe lights trigger an intense flash each time your camera takes a picture, constant lighting remains on, well, constantly.
It should be pretty clear why strobes don't make great lights for video, since they only flash intermittently. The rest of your movie would be rather dark. Instead, fluorescent and LED constant sets are the lights you should look for if you're shooting video.
Constant lights can still work very well for still photography, and I would recommend them to anyone getting started on the path to their lighting education. When you have constant lights set up, you get continuous feedback as to how your scene and subject are lit, allowing you to fine tune the position and intensity of your lights–as well as the settings on your camera–as you go.
For photographers with a little more experience, strobes are often preferred in still photography for their greater intensity, as well as for their kindness to human subjects. If you see a picture of a model who looks like she's squinting, there were probably continuous lights blaring in her face. Your strobes will flash and your camera will capture its well-lit image long before her eyes have time to react, making for a better shot.
Waiting For The Flash
Light has always been a challenge for photographers, dating back to the exposure of the first photographs in the early 1800s. For a long while, photographers merely worked with incredibly long exposure times during which their subjects had to remain as still as possible for up to ten minutes. This allowed their plates to collect the low levels of light that slowly bounced off their subjects in waves.
The invention of the flash bulb in the 1880s gave photographers an opportunity to capture their images much more quickly by producing a burst of tremendous brightness that their cameras could pick up immediately. The downside to these bulbs was that they took time to prepare and were single-use devices that spent their mojo in one hot shot.
Electronic flashes made their way onto the scene in the 1930s, and they steadily took over the market as the preferred method of artificial light among photographers. Developments in fluorescent bulbs and LED technology have since broadened the landscape of options for photographers, working both as strobe flashes and as continuous lighting for still photography and video.


Daniel Imperiale holds a bachelor’s degree in writing, and proudly fled his graduate program in poetry to pursue a quiet life at a remote Alaskan fishery. After returning to the contiguous states, he took up a position as an editor and photographer of the prestigious geek culture magazine “Unwinnable” before turning his attention to the field of health and wellness. In recent years, he has worked extensively in film and music production, making him something of a know-it-all when it comes to camera equipment, musical instruments, recording devices, and other audio-visual hardware. Daniel’s recent obsessions include horology (making him a pro when it comes to all things timekeeping) and Uranium mining and enrichment (which hasn’t proven useful just yet).