The 8 Best Drywall Lifts
This wiki has been updated 40 times since it was first published in January of 2016. No need to struggle with unwieldy panels of drywall on your next construction or renovation project. These lifts make light work of hanging sheet after sheet of plywood and sheetrock so you can get finished in less time and with less effort. Whether you are a home DIYer or a professional contractor, one these handy tools can help you get the job done faster, safer, and more accurately. When users buy our independently chosen editorial selections, we may earn commissions to help fund the Wiki.
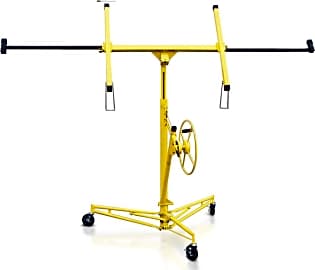
1. Panellift 138-2

2. GypTool 11FT-RED

3. Marshalltown QLT PL589
Editor's Notes
June 18, 2021:
Unfortunately, our previous #1 turned out to suffer from poor quality control, and enough units had flaws that we can no longer recommend it. Instead, the Panellift 138-2 is a high-quality, US-made choice that should get nearly any job done. If it can't, consider the even more robust Panellift 439. The similarly styled Red Line RLP 9000 is basically the light-duty version of both of those, so if you only plan on remodeling your own house, it's worth a look.
January 30, 2020:
Whether due to a falling panel or injury from a strained back, trying to install drywall by yourself can be a dangerous task, not to mention extremely laborious. However, with one of these handy lifts, all those headaches go right out the window. Of course, it is still important to follow the manufacturer's guidelines regarding weight limits and safe operation.
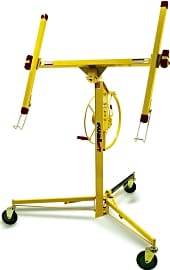
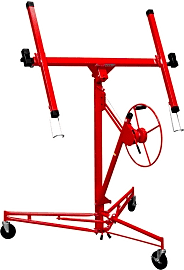
We have included two main kinds of lifts on this list — those that raise panels all the way to the ceiling, and small levers that raise sheets up just a few inches for ground level installations. If you are in need of the former, you will want to look at the Arksen 018-HO-18041, GypTool 11FT-RED, Telpro Inc. 138-2, Troy DPH11, and Red Line RLP 9000. Of these, our favorite is the Arksen 018-HO-18041 due to its wide, four-leg design and integrated work surfaces. We also think users will appreciate its strong braided steel lifting cable and reliable single-stage winch. When it comes to overall build quality, the Telpro Inc. 138-2 stands out, however, its lofty price may put it out of range for the average home user. That being said, we highly recommend it for contractors or anyone else who expects to subject their lift to constant use. The Troy DPH11 is worth mentioning, as well, for its low price and integrated backstop that helps to add stability.
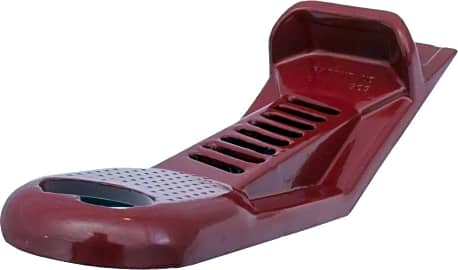
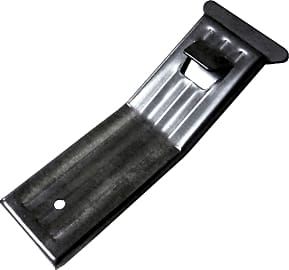
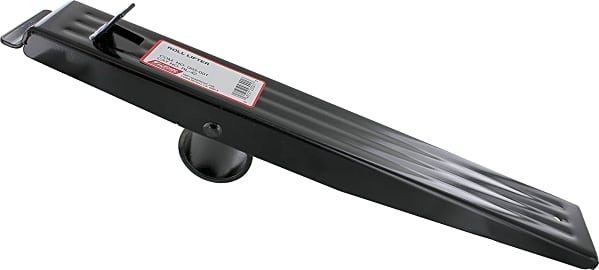
If you simply need to lift drywall panels a few inches off the floor for ground level installation, you will want to consider the Marshalltown QLT PL589, Pentagon Tools 3,000, and Walboard Tool Roll. The Walboard Tool Roll is small enough to fit in a tool chest or tool bag, while the Marshalltown QLT PL589 and Pentagon Tools 3,000 can both be slipped into a pocket. Of these, the Marshalltown QLT PL589 is the most versatile, as it features a rasp for smoothing edges and it even has a bottle opener built into it for cracking a cold beverage after completing a hard day's work.
Special Honors
Panellift 460 The Panellift 460 is a hydraulic model that eliminates the hassle of dealing with a manual winch. A simple push-button operation makes for easy use, and it can fully raise a panel in just eight seconds. Conveniently, it is battery powered, so you don't need to worry about staying connected to an outlet, and it offers more than 60 lifts per charge. paragonpromfg.com
Bil-Jax DL125 With a 200-pound capacity and nearly 12.5-foot maximum lifting height, the Bil-Jax DL125 is slightly more capable than many other models and a good choice for commercial use. It is equipped with three, 4-inch casters; a dual cable lift; and telescoping legs for compact storage. grainger.com
4. Panellift 439
5. Troy DPH11
6. Pentagon Tools 3,000
7. Red Line RLP 9000
8. Walboard Tool Roll
The History Of Drywall
During the war, labor and material shortages intensified the need for low-cost and efficient building materials.
Augustine Sackett invented and patented drywall in 1894. He believed his inside wall covering, as he called it, could make the building process more efficient. Time has proven him correct, as it is now used in 97 percent of new home construction in the United States for just that reason. Augustine went on to start the Sackett Plaster Board Company and named his invention Sackett board. Sackett board was the first ready-made substance that was rigid enough to form a firm wall surface, soft enough to easily admit nails, and strong enough not to crack in the process.
Despite its seemingly obvious benefits, most builders were hesitant to use Sackett board at first. It didn't require the fine craftsmanship associated with applying plaster, leading people to think it was quick fix and would result in shoddy construction.
In 1909, the U.S. Gypsum company purchased the Sackett Plaster Board Company and soon after renamed Sackett board as sheetrock, in the hopes that the new name would instill a sense of confidence in consumers that the product was a high quality building material. For two decades U.S. Gypsum unsuccessfully tried to market sheetrock. Despite the U.S. Army using it as the building material of choice in barracks during WWI because of its fire-resistant nature, and the creators of the Chicago World's Fair Century of Progress International Exposition using it in many of their buildings, sheetrock still retained its reputation as being a low-quality substitute for plaster.
It seemed that drywall was destined to fall by the wayside as an unsuitable building material — and it probably would have — if not for WWII. During the war, labor and material shortages intensified the need for low-cost and efficient building materials. With most of the country's workforce focused on war manufacturing, plastering was no longer a viable option, so builders turned to drywall. By the time the war ended, it was the dominant building material. Once contractors knew they could construct homes and other buildings in a fraction of the time, at a fraction of the cost, and the public had no objection, there was no reason to turn back. Drywall was here to stay.
How To Use A Drywall Lift
The average sheet of 1/2-inch drywall weighs over 50 pounds. This presents a considerable problem for anyone trying to install one on the ceiling without assistance. Enter the drywall lift. A drywall lift makes it easy for somebody to install drywall on a ceiling or wall, without having to enlist the help of a few friends.
Start by releasing the catch on the lift's wheel so that you can crank it up and lower it a few times to ensure everything is working smoothly.
After assembling your drywall lift, clear the floor of any debris in the area when you are installing the drywall. You want to make sure there is nothing that could inhibit the lift's casters from rolling smoothly in whatever direction you need. Start by releasing the catch on the lift's wheel so that you can crank it up and lower it a few times to ensure everything is working smoothly. Next, slightly adjust the lift's cradle so that it is about 10 to 15 degrees off vertical. Setting it too far off of vertical makes it more difficult to load a drywall panel without damaging it, while not coming far enough off of vertical is potentially dangerous.
Once you know the lift is functioning smoothly, have cleared the area of all debris, and have securely locked the cradle into the right position, you can load the drywall panel. Always make sure you load the panel with the finish side facing towards the floor, as this is the side you want facing into the room. After the drywall panel is securely in place, you can continue to rotate the cradle until it is at the same angle as the surface to which you will affix it, unless you are going to be affixing the panel to a vertical wall. In this instance, do not rotate the cradle to a vertical orientation until after you have cranked it to the correct height and placed the panel's bottom lip against the wall.
For all other installations, once you have the cradle at the correct angle, slowly turn the crank to lift the panel in a controlled manner. As you get closer to the panel's final position, you can fine tune the angle. Once everything lines up perfectly, continue to turn the crank until the panel is pressed tightly against the surface. After you have driven a minimum of eight screws into the drywall panel and it is being firmly held in place by them, slowly back the cradle off. Repeat the process until all of your drywall has been installed.
Installing Panels With A Mini Lifter
Drywall lifts are great for installing panels on the ceiling or high up on a wall, but they aren't a pragmatic solution for installing panels just an inch or two off of the floor. In this situation, a mini lifter will be your best bet. Mini lifters are designed to slip underneath the edge of a drywall panel and allow you to relatively effortlessly lift it an inch or two off the ground. To use one, position the drywall panel firmly against the wall where it will be installed. Then, slip the skinny lip of the mini lifter underneath the panel. Gently step down on the opposite side of the mini lifter, which should be raised off the ground. As you apply pressure, the mini lifter will raise the panel.
Mini lifters are convenient as they allow you to lift a sheet of drywall with a single foot, leaving your hands free to fine tune the position a little bit and drive in your screws. As with standard drywall lifts, they allow an individual to install drywall panels without having to enlist the aid of a few friends. They also make commercial drywall installation more efficient, as only one worker is needed to install each panel.
You may also want to consider adding a drywall taper and drywall stilts to your arsenal if you will be installing large amounts of drywall or doing it on a regular basis. These are two more tools that can make a potentially difficult process easier and more efficient.


Building PCs, remodeling, and cooking since he was young, quasi-renowned trumpeter Christopher Thomas traveled the USA performing at and organizing shows from an early age. His work experiences led him to open a catering company, eventually becoming a sous chef in several fine LA restaurants. He enjoys all sorts of barely necessary gadgets, specialty computing, cutting-edge video games, and modern social policy. He has given talks on debunking pseudoscience, the Dunning-Kruger effect, culinary technique, and traveling. After two decades of product and market research, Chris has a keen sense of what people want to know and how to explain it clearly. He delights in parsing complex subjects for anyone who will listen -- because teaching is the best way to ensure that you understand things yourself.